LINUX


Tuesday, 7 July 2015

Howto check disk drive for errors and badblocks

badblocks is a Linux utility to check for bad sectors on a disk drive (A bad sector is a sector on a computer's disk drive or flash memory that cannot be used due to permanent damage or an OS inability to successfully access it.). It creates a list of these sectors that can be used with other programs, like mkfs, so that they are not used in the future and thus do not cause corruption of data. It is part of the e2fsprogs project.

It can be a good idea to periodically check for bad blocks. This is done with the badblocks command. It outputs a list of the numbers of all bad blocks it can find. This list can be fed to fsck to be recorded in the filesystem data structures so that the operating system won’t try to use the bad blocks for storing data. The following example will show how this could be done.

From the terminal, type following command:

$ sudo badblocks -v /dev/hda1 > bad-blocks
The above command will generate the file bad-blocks in the current directory from where you are running this command.

Now, you can pass this file to the fsck command to record these bad blocks
$ sudo fsck -t ext3 -l bad-blocks /dev/hda1
Pass 1: Checking inodes, blocks, and sizes
Pass 2: Checking directory structure
Pass 3: Checking directory connectivity
Pass 4: Check reference counts.
Pass 5: Checking group summary information.

/dev/hda1: ***** FILE SYSTEM WAS MODIFIED *****

/dev/hda1: 11/360 files, 63/1440 blocks
If badblocks reports a block that was already used, e2fsck will try to move the block to another place. If the block was really bad, not just marginal, the contents of the file may be corrupted.

How to Check and repair mysql tables

mysqlcheck is the command line program to check and repair mysql tables.
It performs the same functions as the check table and repair table query statements.
 
Examples:
# mysqlcheck bugs
This checks all of the tables in the bugs database.

# mysqlcheck bugs flags groups
This checks the flags and groups tables in the the bugs database

Using the –repair option you can repair tables using the same syntax as above.

Options to mysqlcheck to just check a table are:
   
–check-only-changed     Same as “check table changed” query
–extended     Same as “check table extended” query
–fast     Same as “check table fast” query
–medium-check     Same as “check table medium” query
–quick     Same as “check table quick” query

Options to mysqlcheck to repair a table are:
   
–repair     Same as “repair table” query
–repair –extended     Same as “repair table extended” query
–repair –quick     Same as “repair table quick” query
–repair –use-frm     Same as “repair table use_frm” query

Tool to Repair Frequent Boot Problems - Boot-Repair

Boot-Repair is an simple tool to recover access to your Operating Systems.

 * Easy-to-use (repair in 1 click ! )
 * Free (GPL open-source license)
 * Safe (automatic backups)
 * Can recover access to Windows (XP, Vista, Seven).
 * Can recover access to Debian, Ubuntu, Linux Mint...
 * Can recover access to any OS (Windows, MacOS, Linux..) if your PC contains Debian, Ubuntu or derivative.
 * Can repair MBR-locked OEM computer boot if the original boot-sector has been saved by Clean-Ubiquity
 * Can repair the boot when you have the "GRUB Recovery" error message
 * Options to reinstall GRUB2 boot-loader easily (OS by default, purge, unhidden, kernel options..)
 * and much more ! (EFI, SATA, filesystem repair...)

Three possibilities to get Boot-Repair:
 * Boot-Repair-Disk is the official CD containing the very last version of Boot-Repair
 * Boot-Repair is also included in all Ubuntu Secured CDs and many other distributions (Hybryde, AriOS, PinguyOS...)
 * Boot-Repair can be installed & used in Debian and derivatives (Ubuntu, Linux Mint...), either normal session, or live-CD, or live-USB.

To get started, open a Terminal Window and enter the below commands:

sudo add-apt-repository ppa:yannubuntu/boot-repair
sudo apt-get update
sudo apt-get install boot-repair-ubuntu
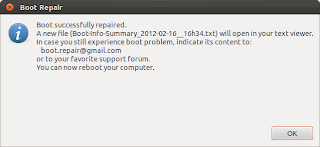
Once Boot Repair is installed, launch it from Applications Menu or from Unity Dash and Then try "Recommended repair" button and after successful repair you should see something like ... as shown in below pic ...

When repair is finished, reboot and check if you recovered access to your OSs,


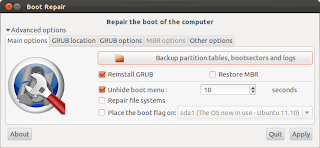
Or, if required you can click on the "Advance" settings to view/modify your repair settings ..


How to check/repair (fsck) filesystem after crash or power-outage

At some point your system will crash and you need to perform a manual repair of your file system. A typical situation would be power loss while you are working on the system. You reboot and the system stops and indicates you must perform a manual repair of the system using fsck.

fsck (file system consistency check) is a command used to check filesystem for consistency errors and repair them on Linux filesystems. This tool is important for maintaining data integrity so should be run regularly, especially after an unforeseen reboot (crash, power-outage).

Usage: fsck [-sACVRTNP] [-t fs-optlist] [filesystem] [fs-specific-options]

Filesystem can be either a device's name (e.g. /dev/hda) or its mount point. fsck run with no options will check all devices in /etc/fstab. It might be neccesary to run fsck from single-user mode

Note: You need to be "root" to use any of the below mentioned command

* Take system down to runlevel one: # init 1

* Unmount file system, for example if it is /home (/dev/sda2) file system then type command:

# umount /home OR  # umount /dev/sda2
* Now run fsck on the partition: # fsck /dev/sda2

* Specify the file system type using -t option:  
# fsck -t ext3 /dev/sda2 OR  # fsck.ext3 /dev/sda2
fsck will check the file system and ask which problems should be fixed or corrected. If you don't wanna type y every time then you can use pass -y option to fsck: 
# fsck -y /dev/sda2
Please note if any files are recovered then they are placed in /home/lost+found directory by fsck command.

* Once fsck finished, remount the file system: # mount /home

Read man page of fsck for more information.
Make sure you replace /dev/sda2 with your actual device name.

How to Compile and Run C# .NET application on Ubuntu - mono

Mono is a software platform designed to allow developers to easily create cross platform applications. It is an open source implementation of Microsoft's .Net Framework based on the ECMA standards for C# and the Common Language Runtime.

There are several components that make up Mono:
C# Compiler - The C# compiler is feature complete for compiling C# 1.0 and 2.0 (ECMA), and also contains many of the C# 3.0 features.

Mono Runtime - The runtime implements the ECMA Common Language Infrastructure (CLI). The runtime provides a Just-in-Time (JIT) compiler, an Ahead-of-Time compiler (AOT), a library loader, the garbage collector, a threading system and interoperability functionality.

Base Class Library - The Mono platform provides a comprehensive set of classes that provide a solid foundation to build applications on. These classes are compatible with Microsoft's .Net Framework classes.

Mono Class Library - Mono also provides many classes that go above and beyond the Base Class Library provided by Microsoft. These provide additional functionality that are useful, especially in building Linux applications. Some examples are classes for Gtk+, Zip files, LDAP, OpenGL, Cairo, POSIX, etc.

Installing Mono:
Open up the terminal Application > Accessories > Terminal and type following command
sudo apt-get install mono-xsp2 mono-xsp2-base
Console Hello World
To test the most basic functionality available, copy the following code into a file called hello.cs.
#include<stdio.h>
main()
{
   printf("Hello World\n");
   printf("My First C Program\n");
}

To compile, use gmcs: gmcs hello.cs
Here compiler will create "hello.exe"

Now execute the hello.ext using command: mono hello.exe
The program should run and output:
Hello Mono World


GUI Tool to dump (clone/image) Files, Disks, Partitions - Gdiskdump

dd is a common Unix program whose primary purpose is the low-level copying and conversion of raw data. dd is an application that will "convert and copy a file" dd can also be used to copy regions of raw device files, e.g. backing up the boot sector of a hard disk, or to read fixed amounts of data from special files like /dev/zero or /dev/random.

The dd utility copies the specified input file to the specified output with possible conversions. The standard input and output are used by default. The input and output block sizes may be specified to take advantage of raw physical I/O. Sizes are specified in bytes; a number may end with k, b, or w to specify multiplication by 1024, 512, or 2, respectively

There is a command line involved in using dd command and if you are afraid of using command line or you are just a normal desktop user you can use the GUI version of the dd command know as - Gdiskdump

Gdiskdump is a open source Graphical User Interface for the Unix Command dd. You can easily select the Input- and Outputstream, so you can clone or image your Harddrive or Partition.

Gdiskdump Installation:
Download deb package for Maverick Meerkat, Lucid Lynx (x86 and amd64) and below.
Download deb package for Natty Narwhal (x86 and amd64) and above.

Download the Gdiskdump package and double-click on it to install it using software center, after successful installation you can find the Gdiskdump under Application > Accessories > Gdiskdump


Multi-Tabbed PuTTY - MTPuTTY

PuTTY is the most popular SSH client for Windows. One, and probably the only one, of PuTTY drawbacks is that you need to start a new copy of PuTTY every time you open a new connection. So if you need e.g. 5 active connections you run 5 PuTTY instances and you have 5 PuTTY windows on the desktop.

MTPuTTY (Multi-Tabbed PuTTY) is a small *FREE* utility enabling you to wrap unlimited number of PuTTY applications in one tabbed GUI interface. You are still continue using your favorite SSH client, but you are no longer messing around with PuTTY windows - each window will be opened in a separate tab.

All PuTTY features
Supports all PuTTY protocols - SSH, Telnet, Rlogin, Raw. Supports PuTTY session. You can control and change PuTTY command line parameters. You can run PuTTY configuration from within the program.

Automation
Can automatically login the remote servers and "type" your passwords. Can run any script after login. Can "type" a script in several PuTTY tabs simultaneously.

Easy to use
Clear tabbed user interface. Servers are grouped in a sidebar. Taskbar to quick access to basic program tasks. Any PuTTY tab can be detached and converted into a general PuTTY window.

Smart code
Native Win32 code - no need to have any libraries (like .NET, VB etc). Multithreaded automation tasks - freezing in one PuTTY tab will not freeze the other ones.